
Staying safe online and safeguarding your privacy is not always easy. With new forms of harmful software popping up continuously and your IP address often on display whenever you visit a website, threats lurk around every corner. Thankfully, there are ways to bolster your protection.
One strategy is using a proxy. A proxy server works like a shield, standing between you and the websites you choose to visit. It can keep you safe by blocking harmful or unwanted content and also hides your IP address.
Let’s explore how you can set up and use a proxy with Google Chrome, a popular web browser for many people.
Understanding Proxies
A proxy, in simple terms, functions as an intermediary between your device and the internet. It fetches web content on your behalf, hiding your identity and keeping your IP address a secret.
Not just limited to guarding your privacy, proxies also offer convenience. They manage web data on your behalf, creating a more streamlined online experience.
With the use of a fast residential proxy, your online tasks can be expedited discreetly. These proxies imitate regular internet user traffic, making them suitable for online tasks where you wish to avoid triggering alarms on the websites you visit.
Why Many People Choose Chrome
Google Chrome has appealed to many users due to its reliability, speed, and versatility. It offers a multitude of extensions, enabling users to customize their browsing experience and enhance productivity.
To determine which proxy browser to use for your unique case, read this proxy browser ranking. Popular proxy browsers are easy to use and have free versions.
Integrating a Proxy in Chrome
The thought of navigating through multiple settings can be daunting, especially when you’re tasked with setting up a proxy. However, Chrome’s user-friendly interface simplifies this task considerably, and the following step-by-step instructions will guide you through the process:
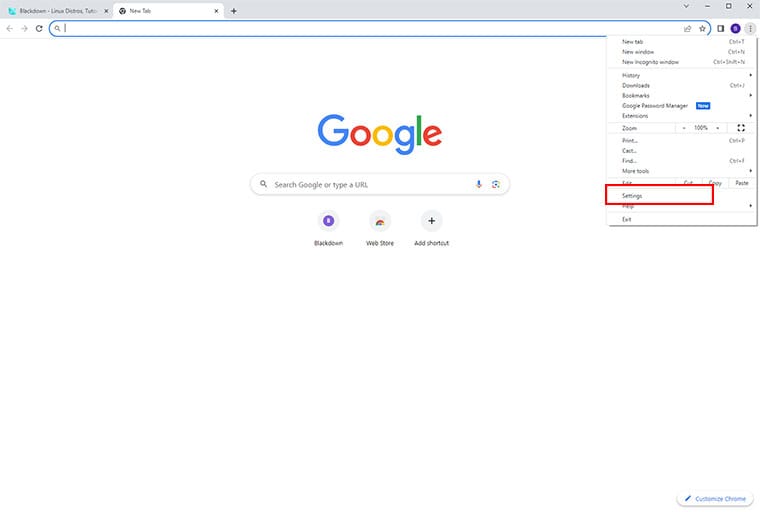
1. Accessing Chrome’s Settings:
- Open Google Chrome.
- In the top-right corner, click on the three vertical dots – the Chrome menu.
- A drop-down menu will appear – select ‘Settings’.
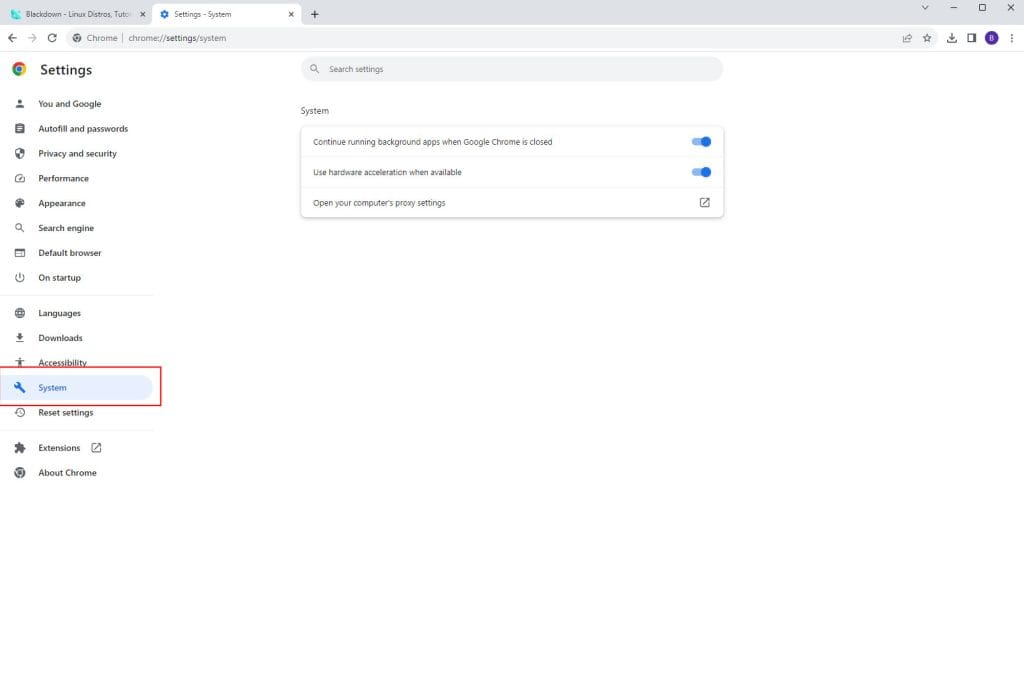
2. Accessing Advanced Settings:
- Scroll down in the Settings tab until you find the ‘System’ option and click on it.
- Locate the ‘System’ section and click ‘Open your computer’s proxy settings’.
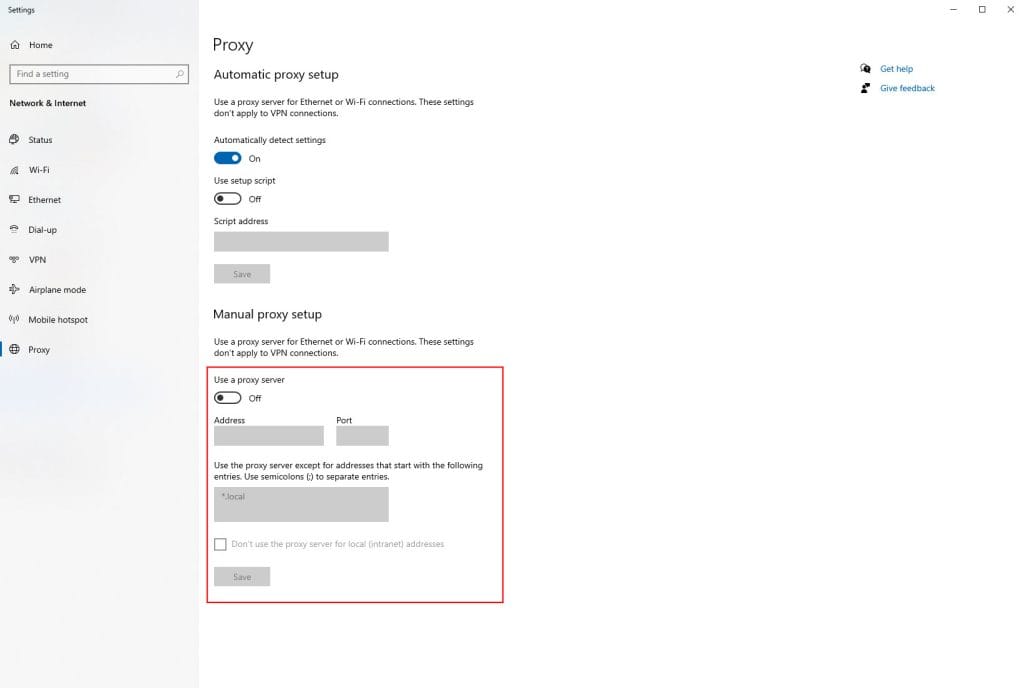
3. Manually Configure the Proxy:
- Here, you’ll see the options ‘Automatically detect settings’ and ‘Manual proxy setup.’ Select the latter.
- Toggle on the ‘Manual proxy setup’.
- You will then see fields where you can enter your proxy’s information. Input your proxy server’s IP address and the port number.
- If your proxy setup requires a username and password, you’ll find additional fields for this information – fill them in, if needed.
- If you don’t already have proxy credentials, you can get them from providers like Decodo or Webshare. These services offer easy-to-use dashboards where you can generate proxy addresses and authentication details to use in Chrome.
4. Verify Proxy Setup:
- After the necessary details have been entered, save or apply the changes.
- Return to Chrome and open a new tab.
- Visit a website that checks your IP address to determine whether your proxy is working properly. If the IP address showing matches your proxy and not your original one, you’ve successfully set up your proxy in Chrome.
Keeping Your Chrome Proxy Running
Setting up your proxy on Chrome is only part of the process. Here are some tips to keep it running smoothly:
Verify Proxy Regularly: Use online tools to frequently check on your proxy server’s health as they can occasionally go offline.
Address Connection Problems: If you frequently experience disconnections or slow browsing speeds, it might imply issues with your proxy. It’s crucial to distribute the load on your proxy server and, if need be, delegate tasks across more than one proxy.
Choose Quality Over Cost: Free proxies might appear tempting, but they may not always be reliable or safe. Placing trust in your proxy provider is crucial. Reliable providers ensure that everything runs smoothly and your connection is secure.
Alternative Method Using a Proxy Manager
If you’re seeking an alternative solution to set up a proxy on your browser, consider using the FoxyProxy extension. FoxyProxy is a popular browser extension that automatically switches an internet connection across one or more proxy servers based on URL patterns. It’s an effective tool usable on both Chrome and Firefox.
FoxyProxy simplifies the process of configuring browsers to access proxy servers, thereby saving you the time and effort of manual configuration. Simply put, every time FoxyProxy notices that you’re trying to access a site that fits a certain pattern, it switches your Internet connection to a specific proxy—making it highly efficient and user-friendly.
Our FoxyProxy guide covers the steps required to set up and use the manager.
Conclusion
Adding and managing proxies in Chrome is a simpler process than it seems, and the benefits are well worth it. Having said that, proxies are excellent tools for your online journey. Among the different types, datacenter proxies often emerge as the go-to choice for seasoned internet users. You can explore some of the best datacenter proxies that offer top-performing capabilities and promise a reliable and smooth internet navigation experience.
Frequently Asked Questions
What does a Chrome proxy do?
A Chrome proxy forms a type of proxy utilised in Chrome for maintaining a user’s anonymity while surfing the web.
Where can I locate the proxy settings in Chrome?
For individuals using Windows, click the three-dot menu button and opt for Settings. Then, pick System and select Open your computer’s proxy settings, which will lead you to your system’s proxy settings.
How can I exclude a proxy in Chrome?
While within the Windows system settings, traverse to Internet Options > Connections > LAN settings. Below Proxy server, select Advanced and insert your exception URLs with each separated by a semicolon.