Staying a newbie in PostgreSQL for the rest of your SQL career isn’t your dream. After making strides in learning and crafting the best Data Manipulation Language, you hunger for more knowledge and skills. One day, you will have to import and export some Postgres.
And it’s not without troubles and obstacles.
Anyway, you’re here today because you want to know how it’s done. So, that’s what you’ll get and more.
Here’s what’s in store for you:
- How to export data from PostgreSQL: You’ll be introduced to tools like COPY, pg_dump, and dbForge Studio for PostgreSQL. You will get practical examples that you can use immediately. This includes exporting to CSV and other formats.
- How to import data to PostgreSQL: We will use COPY, pg_restore, and dbForge Studio for PostgreSQL. Learn from practical import examples that are useful in your daily database tasks.
- 8 common mistakes newbies make in Postgres import and export: If your CSV delimiter is also used inside your data, what do you do? This and other mistakes with some suggestions to fix.
Let’s dive in.
How to Export Data from PostgreSQL
Exporting is about making a copy of your data in PostgreSQL, then, saving it to another format. Good thing you’re not tied to a single tool. There are many tools to do this. Whether you love memorizing syntax and typing them in the CLI or using a GUI wizard, there’s something for you.
Let’s start with COPY.
Using COPY for Postgres Export
The COPY command is a CLI command. So, you need to go inside psql to do this. By the way, I’m using Ubuntu 22.04 for my PostgreSQL server. But the command syntax we’ll use here applies to other operating systems as well.
So, before you run your first COPY command to export some data, run psql in your local PostgreSQL server:
$ psql -h localhost -U postgres -W -d dbnameYou need the -h localhost to tell psql you want to use the local server. If you remove this option, you will get a similar error below:
psql: error: connection to server on socket "https://cdn.blackdown.org/var/run/postgresql/.s.PGSQL.5432" failed: FATAL: Peer authentication failed for user "postgres"That being said, the -U postgres tells psql to use the postgres user. Then, the -W option will prompt you for the password of the postgres user. And the -d dbname will let you use a database named dbname after a successful connection. And in our examples later, I’ll be using testdb as my PostgreSQL database name.
But I can’t show you the COPY syntax yet. First, let’s create our test table:
CREATE TABLE email_contacts (
    id SERIAL PRIMARY KEY,
    name VARCHAR(50),
    age INT,
    email VARCHAR(100),
    date_added DATE
);
Then, let’s insert some sample data:
INSERT INTO email_contacts (name, age, email, date_added) VALUES
('Alice', 30, 'alice@example.com', '2022-01-15'),
('Bob', 25, 'bob@example.com', NULL),
('Charlie', 35, NULL, '2022-01-20'),
('David', 40, 'david@example.com', '2022-01-25'),
('Eve', 28, 'eve@example.com', NULL),
('우지', 50, 'woozi@example.com', '2022-02-01'),
('Grace', 32, NULL, '2022-02-05'),
('Hank', 29, 'hank@example.com', '2022-02-10'),
('Ivy', 31, 'ivy@example.com', NULL),
('Jack', 27, NULL, '2022-02-15'),
('Karen', 45, 'karen@example.com', '2022-02-20'),
('Leo', 38, 'leo@example.com', NULL),
('Mona', 33, 'mona@example.com', '2022-02-25'),
('Nina', 36, NULL, '2022-03-01'),
('Oscar', 41, 'oscar@example.com', '2022-03-05'),
('ナルト', 34, 'naruto@example.com', NULL),
('Quinn', 26, NULL, '2022-03-10'),
('Rachel', 37, 'rachel@example.com', '2022-03-15'),
('Steve', 42, 'steve@example.com', NULL),
('O''Neil', 39, NULL, '2022-03-20');
Notice that we have some NULL column values and a name with a quote. We also have foreign names, and we’ll see if these won’t be obstacles to our examples.
Now that we have some test data, we’re ready to COPY.
COPY Syntax
The basic COPY syntax to export data is pretty straightforward. Check it out:
COPY { table_name [ ( column_name [, ...] ) ] | ( query ) }
TO { 'filename' | PROGRAM 'command' }
[ [ WITH ] ( option [, ...] ) ]

where option can be one of:
    FORMAT format_name
    DELIMITER 'delimiter_character'
    NULL 'null_string'
    HEADER [ boolean | MATCH ]
    QUOTE 'quote_character'
    ESCAPE 'escape_character'
    FORCE_QUOTE { ( column_name [, ...] ) | * }
    ENCODING 'encoding_name'
The most basic part is the COPY keyword itself. Then, followed by the table name, the keyword TO, and the filename where the data will go. The keyword TO means we will export some data.
Let’s explain this syntax with examples next.
Practical Examples of Using COPY for Postgres Export
Example 1: Basic Example
The most straightforward example is to export all the rows of a table to a file with no other options. This will export the data to a text file by default.
Check out the example below:
email_contacts TO 'https://cdn.blackdown.org/var/lib/postgresql/default.txt';The above code will copy all the rows in the email_contacts table to /var/lib/postgresql/default.txt. It will use the default tab-delimited text file format. Check out the resulting file below:
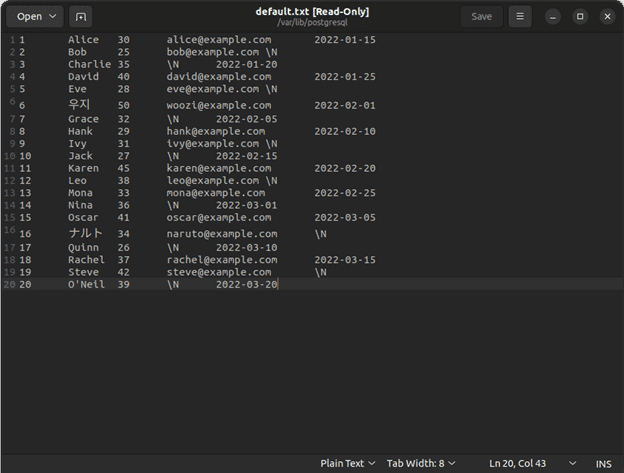
It accepted the Japanese and Korean names and the name O’Neil that has a quote in it. The ones with \N are nulls. Each column value is separated by tabs (ASCII character 9).
Example 2: Export to a CSV File with Headers and Null Handling
Our next example will use the CSV file format with headers.
email_contacts TO 'https://cdn.blackdown.org/var/lib/postgresql/csv-sample.csv' WITH (FORMAT CSV, HEADER TRUE, DELIMITER ',', NULL 'N/A');The code above will export all rows to the csv-sample.csv with headers, comma delimiter, and nulls exported as N/A.
So, below is the resulting file:
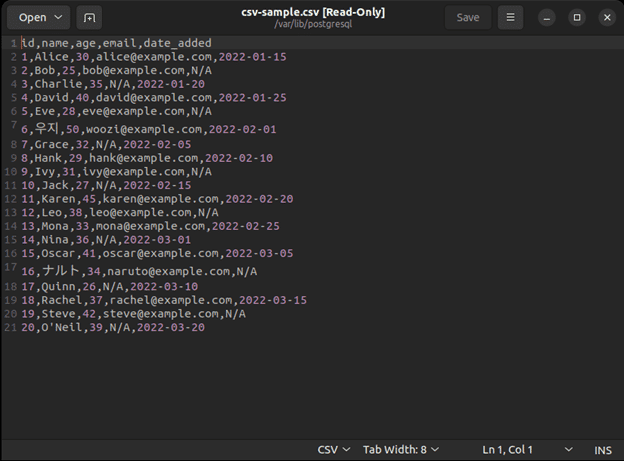
Line 1 is the CSV header. Then, we can see commas separating each column value. We also see null values as N/A. Finally, we can see the foreign names and O’Neil in the file.
Note that you can change the delimiter to a pipe character ( | ), a semicolon ( ; ), or anything appropriate.
Example 3: Force Quote Specific Columns
Some characters may trigger errors when imported back to the database. So, it’s a good thing to enclose them with quotes. Using the FORCE_QUOTE option will do this. Check it out below:
COPY email_contacts TO 'https://cdn.blackdown.org/var/lib/postgresql/csv-force-quote.csv' WITH (FORMAT CSV, HEADER TRUE, DELIMITER '|', NULL 'N/A', FORCE_QUOTE(name, email));It’s almost the same as before but we used a pipe delimiter and added the FORCE_QUOTE for the columns name and email.
The following is the exported file:

The above illustration shows an enclosed name and email address values with double quotes.
Example 4: Using a Query Instead of a Table
You can also use a query instead of a table name to export data. Check out the example below:
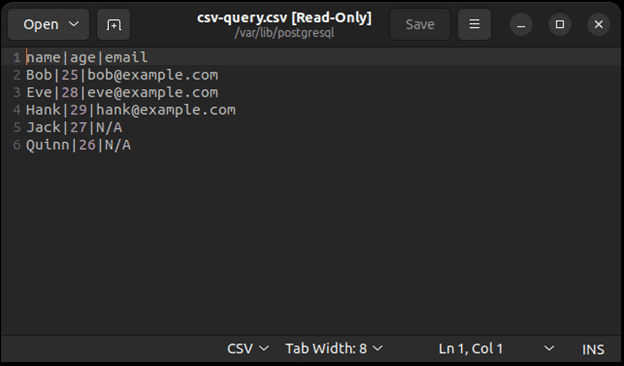
COPY (SELECT name, age, email FROM email_contacts WHERE age < 30) TO 'https://cdn.blackdown.org/var/lib/postgresql/csv-query.csv' WITH (FORMAT CSV, HEADER TRUE, DELIMITER '|', NULL 'N/A');Notice that the query should be enclosed in parentheses.
And the output? Check it out below:
Great!
All contacts that are less than 30 years old are exported to the CSV file. The nice thing about using a query is when you need to output values from joined tables or other complex SELECT statements.
Example 5: Compressing the Exported File
You can compress the exported file using the PROGRAM option and the gzip program. Here’s an example:
email_contacts TO PROGRAM 'gzip > /var/lib/postgresql/contacts.gz';This option will export it to a file named contacts. It will be a tab-delimited text file like the one in Example 1. Then, COPY compresses the file using the gzip program.
Example 6: Exporting to Binary Format
For large datasets, exporting to binary is the fastest option. Here’s an example:
email_contacts TO 'https://cdn.blackdown.org/var/lib/postgresql/contacts.dat' WITH (FORMAT BINARY);The exported file will be unreadable to our eyes.
Example 7: Using QUOTE in a CSV File
If your CSV file is comma-delimited but there’s a comma in the data, that could be problematic when importing them back to the table. So, you use the QUOTE option to quote those values with a comma when exporting.
Here’s an example:
-- insert the data with a comma
INSERT INTO email_contacts (name, age, email, date_added) VALUES ('Charles, Jr.',20,'charles_jr@example.com','2024-06-08');

-- export the data using QUOTE
COPY email_contacts TO 'https://cdn.blackdown.org/var/lib/postgresql/csv-quote.csv' WITH (FORMAT CSV, HEADER TRUE, DELIMITER ',', NULL 'N/A', QUOTE '`');
The above code inserted a name with a comma (Charles, Jr.). Then, we export the file with the QUOTE option.
To QUOTE the value with a comma, we use a backtick. You can use double quotes if you like.
The following is the exported file:
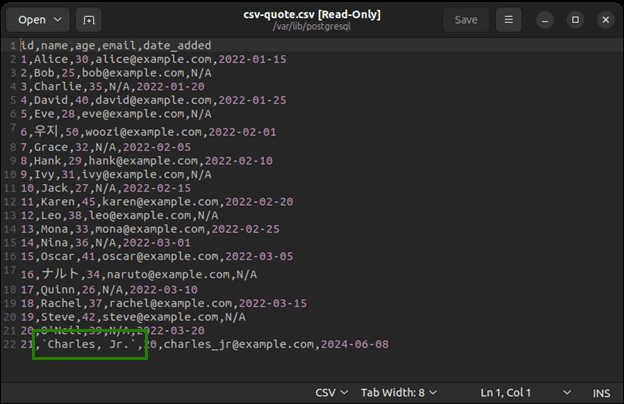
Up there is Charles, Jr. boxed in green. Importing this CSV back to the table using the same QUOTE option will succeed.
Example 8: Using Encoding
My server’s encoding uses UTF8. This means PostgreSQL can store other foreign characters aside from English. What if we try the LATIN1 (Western European) encoding for our sample data?
Here’s the code:
COPY email_contacts TO 'https://cdn.blackdown.org/var/lib/postgresql/csv-encoding.csv' WITH (FORMAT CSV, HEADER TRUE, DELIMITER ',', NULL 'N/A', QUOTE '`', ENCODING 'LATIN1');This will trigger an error because of the Japanese and Korean names we have in the data. Here’s the error in mine:
ERROR: character with byte sequence 0xec 0x9a 0xb0 in encoding "UTF8" has no equivalent in encoding "LATIN1"Using PG_DUMP for Postgres Export
The pg_dump tool is more of a database backup tool than an export tool. But since it can give you backups in different formats and let you select the tables you need, it can also be used as an export tool.
The plus side of pg_dump over COPY is it can export all the tables in one command. COPY can only export one table at a time.
Using pg_dump also includes the table structure, not just data. This is not a surprise for a backup tool. You can dump structure only, data only, or both. The default is both.
The basic syntax we need for export purposes is the following:
pg_dump -h hostname -U username -W -F format -f filename_directory dbname [-t table_name] [-a] [-s]-h hostname: specify the hostname of the PostgreSQL server you are connecting to.-U username: The user account in PostgreSQL that you’re going to use.-F format: Defines your desired file format for the export output. Options are:p: plain text or an SQL file that will output a file with SQL statements.c: a custom format suitable forpg_restore. The exported file is also compressed by default.d: outputs a dump for each table or large object in a folder or directory. It also uses a gzip compression, and it supports parallel dumps.t: This dumps to a TAR-format archive.
-f filename_directory: This is either a full path and a filename or a folder or directory name, depending on the -F format.dbname: The name of the database.-t table_name: Optional. You can specify a table name or pattern that you want to dump into the output file.-a: Optional. Dumps only the data, not the table structure or schema.-s: Optional. Dumps only the schema, not the data.
Practical Examples of Using PG_DUMP for Postgres Export
We have an example for each file format supported by pg_dump and pg_restore.
Example 1: Export One Table
The following will export the email_contacts table using the -F p option for plain SQL file format.
pg_dump -h localhost -U postgres -W -F p -f ~/Source/sql/testdb_backup.sql testdb -t email_contactsThis will export the table structure and data of the email_contacts table using a plain SQL text file. After you enter the correct password, the exporting begins. The following is a sample of the SQL file from pg_dump:
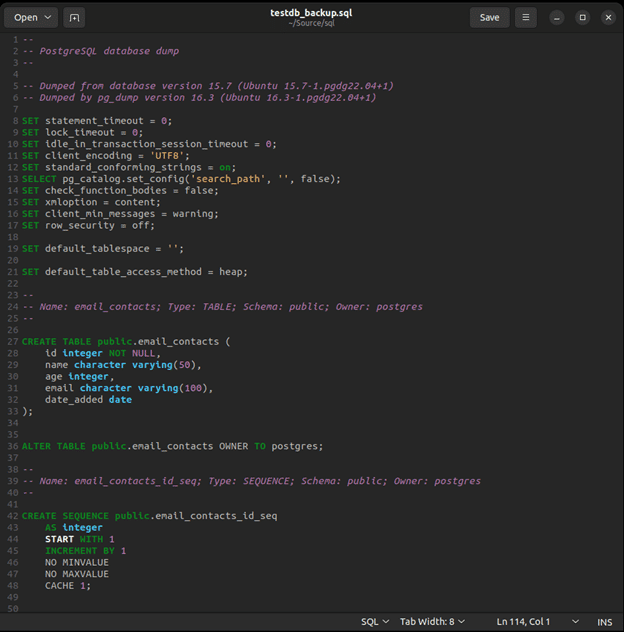
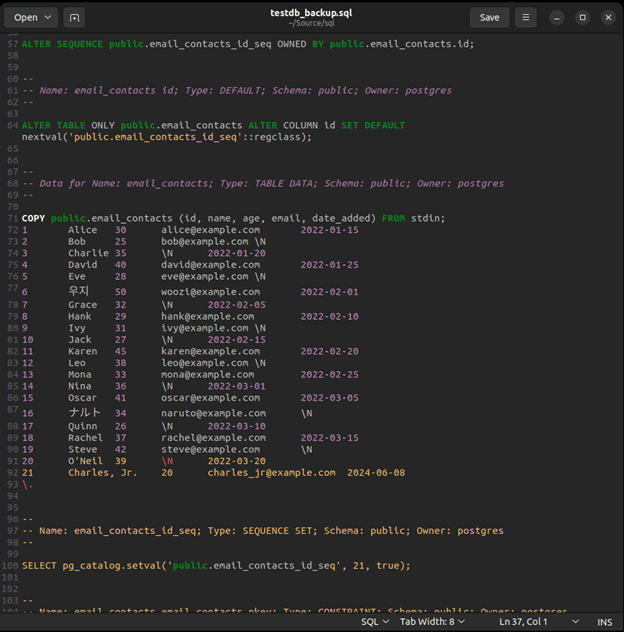
This part only shows the schema or table structure. The next illustration will show the part where the data is dumped. Surprisingly, it uses COPY. Check it out below:
Example 2: Exporting All Tables Into an SQL File
When exporting all tables, you only need to remove the -t option. See below:
pg_dump -h localhost -U postgres -W -F p -f ~/Source/sql/testdb_backup.sql testdbSo, if the testdb database has other tables aside from email_contacts, it will be included.
The plain SQL file format is good for small to medium size databases. If you also plan to edit the output script later, this is for you.
Example 3: Export to a Directory or Folder
What does dumping to an export or backup folder look like?
The output files are compressed so it’s not human-readable. But let’s have the sample anyway. We will use the -F d option.
pg_dump -h localhost -U postgres -W -F d -f ~/Source/sql/testdb testdbAfter entering the correct password, dumping begins. It will write a new folder called testdb in ~/Source/sql/. You have to specify the folder name, or it won’t be written, and an error occurs.
The following are the output files:
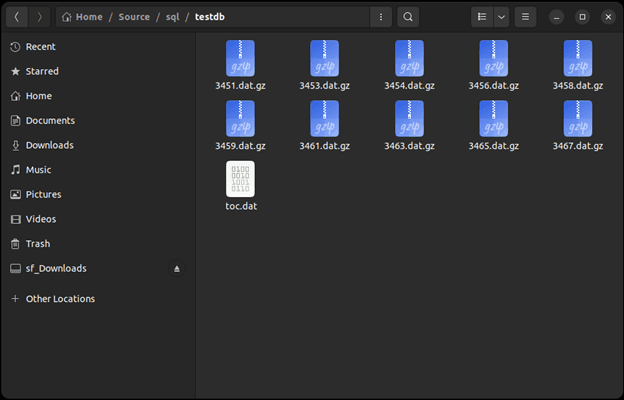
All the gzip files are individual tables. There’s also a table of contents (toc.dat) file that pg_restore can read when restoring. We have no control over how the files will be named.
The directory format is one of your choices for very large databases.
Example 4: Export to a Custom Format
The custom format does not mean that you can customize the format. It means that it’s a special format that is fast, flexible, and compressed so that pg_restore can read when you need to restore.
Here’s a sample using the -F c option.
pg_dump -h localhost -U postgres -W -F c -f ~/Source/sql/testdb.custom testdbThe above will dump all tables into a file called testdb.custom.
Example 5: Export to a Tar Format
Using the -F t option of pg_dump will output a Tar-archive file. Surprisingly, when you extract the Tar archive, it will be compatible as a directory format (-F d).
Here’s a sample:
pg_dump -h localhost -U postgres -W -F t -f ~/Source/sql/testdb.tar testdbThis will dump to a Tar file named testdb.tar. If you check the Tar archive for its contents, it will be something like this:
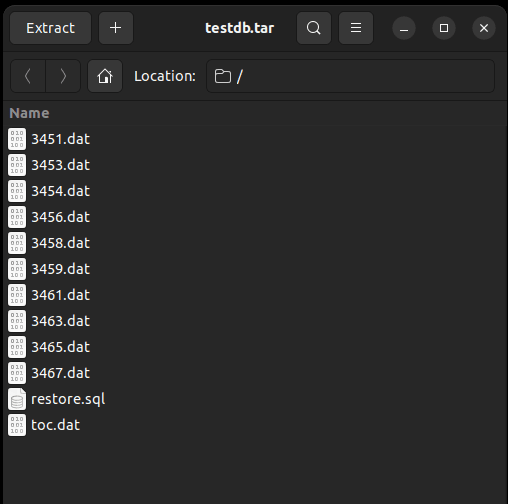
Each table is in a .dat file. There’s also a Table of Contents (toc.dat) and a restore script file.
Using dbForge Studio for PostgreSQL to Export Data
dbForge Studio for PostgreSQL is a GUI tool. So, exporting data will use a wizard for the step-by-step process.
Below is how to start the Export wizard:
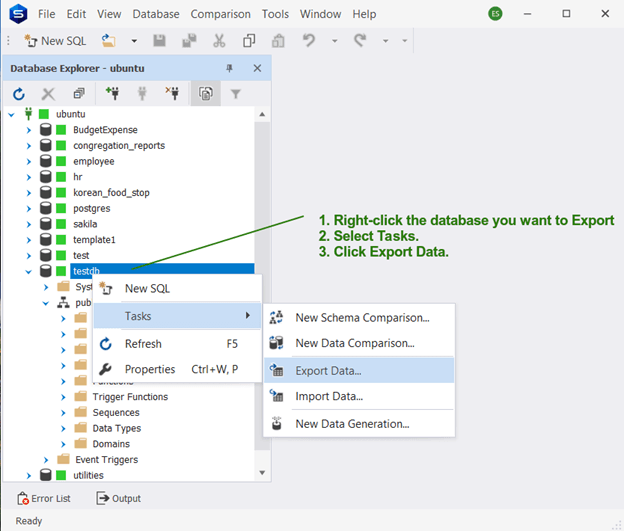
From the Database Explorer, simply right-click the database you want to export some data. Then, select Tasks from the context menu. Then, click Export Data.
Postgres Export Data Using dbForge Studio for PostgreSQL
Step 1: Choose Export Format
You can use dbForge Studio for PostgreSQL to export to 14 formats. These include ODBC, which expands the number of formats to all ODBC-compliant databases. See it below:

To do the same data exports we did using COPY, let’s choose CSV. Then, click Next.
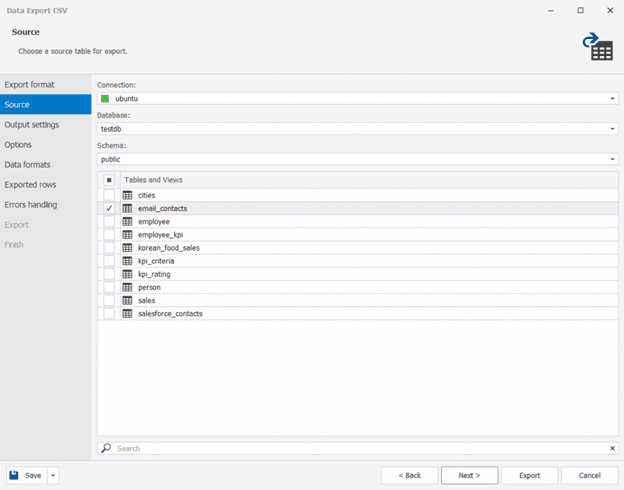
Step 2: Choose the Source
In this step, you choose a table or a group of tables you want to export. It can also be all tables. See a sample below where we choose the email_contacts table only.

Then, click Next.
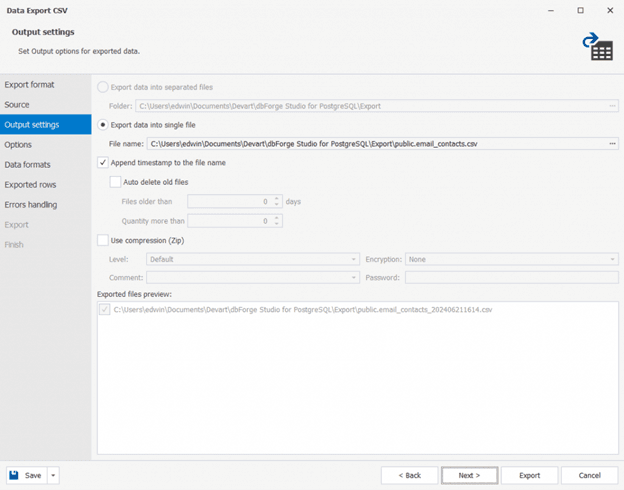
Step 3. Choose Output Settings
This step will let you specify the filename for the CSV or even compress the output to a Zip File. It will also allow you to remove old export files found in the same folder you want to place the output.
Check out the following screenshot:
Then, click Next for the next step.
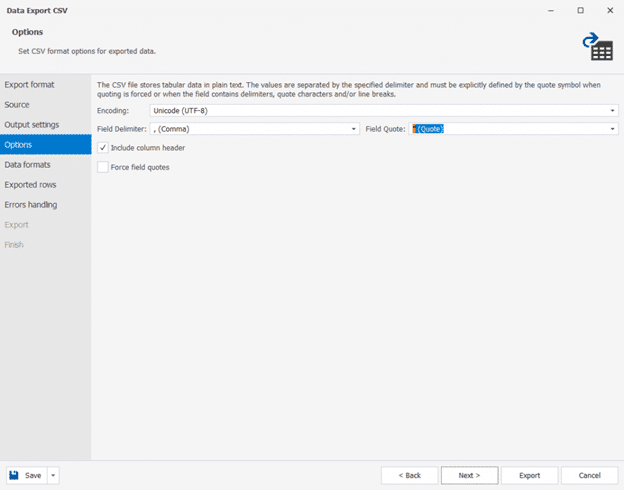
Step 4. Choose Export Options
In this step, you can choose the encoding, the quote, and the delimiter for the CSV file. You can also choose if you want to add column headers and to force quote the columns. Those familiar with COPY will appreciate these options.
Check out the following screenshot:
You can click Export at this point or click Next for more options.
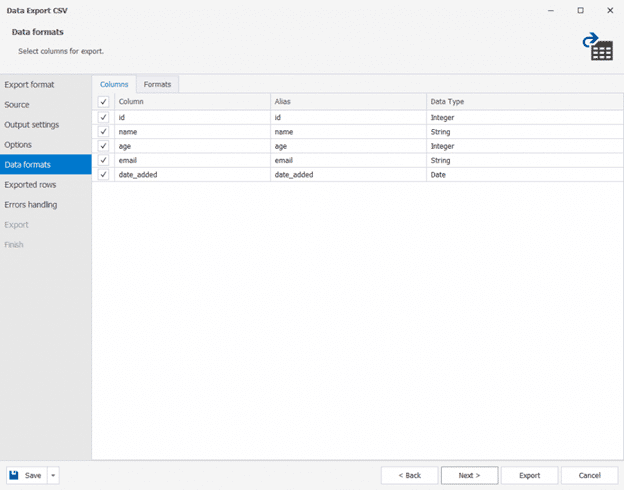
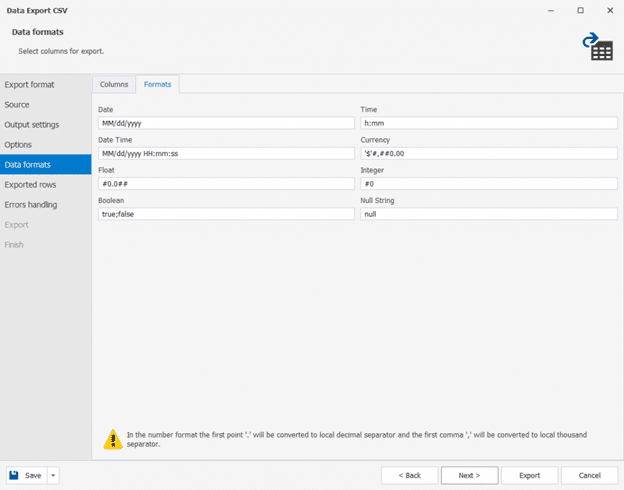
Step 5: Specify Column Data Formats
This step will let you choose formats for dates and numbers. It will also let you handle null values. Then, apply the data types to each of the columns. You can even choose the columns in the output by marking them with a check.
Check out the screenshot below for choosing the columns in the output:
Below is the screenshot for the data type formats:
You can change these options or accept the defaults.
Click Next for the next step, or click Export to export now.
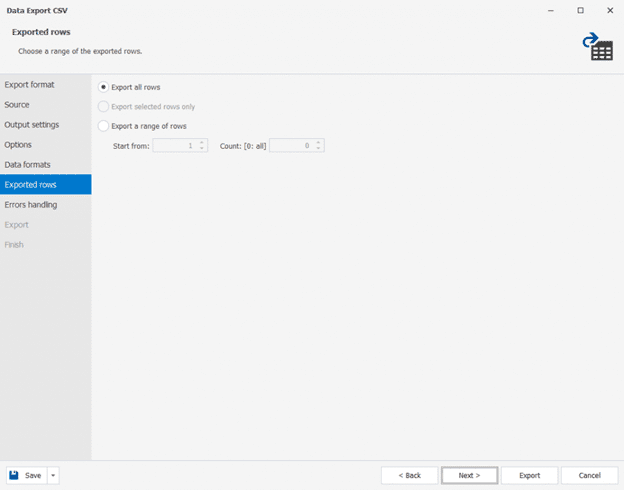
Step 6: Choose to Export All Rows or a Range of Rows
The default option is All Rows. You can change the setting by specifying a range.
See an example below:
Then, click Next for the next step.
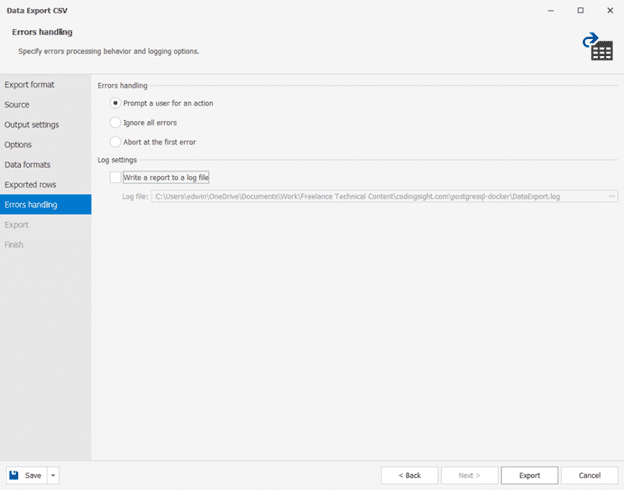
Step 7: Choose the Error Handling Method and Logging Option
This step will let you choose if you want a prompt when there’s an error, simply ignore the error, or abort on the first error. Then, mark checked the logging option and choose a log file.
The following is an example:
At this point, you can choose to go Back, Export, or Cancel everything.
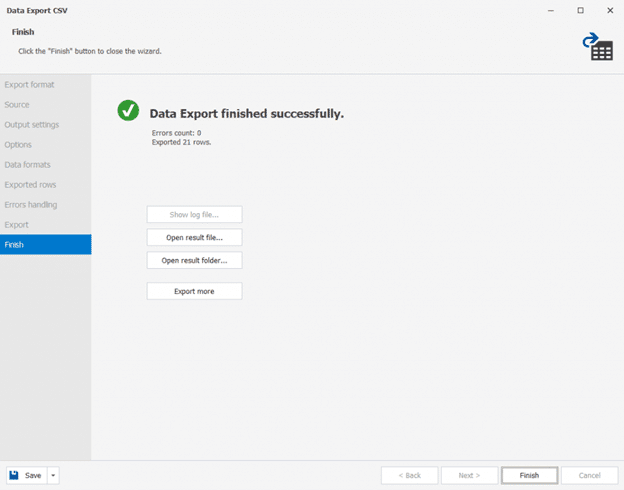
Once the export process is completed, you will see a window like the one below:
You can now Open the result file or folder. Or click Finish or Export More.
Command-Line Options and Automating the Postgres Export
But there’s more.
You can save the options you choose and automate the Postgres export process.
How?
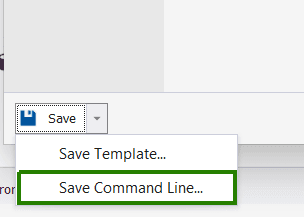
If you notice in most of the wizard steps earlier, there’s a Save button on the lower left side. Click the down arrow and select Save Template. Enter a filename for the template and save. Then, click the down arrow again and click Save Command Line. See a sample below.
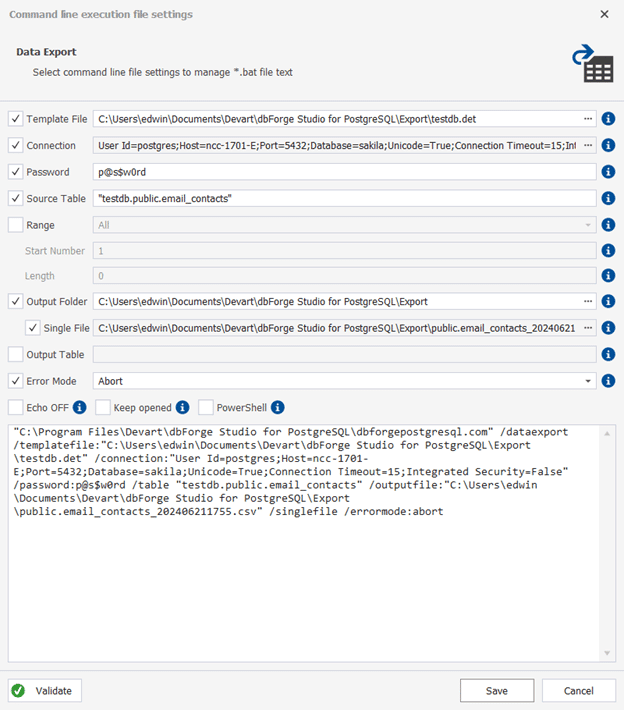
Then, a new window will appear. You need to specify the password and change some more options if you like. See a sample below:
Then, click Save. This will save a batch file. So, enter a filename for that. You can automate this using Windows Task Scheduler or other automation tool to make it run regularly.
That’s it for exporting data to a CSV file in dbForge Studio for PostgreSQL. Try the other file formats to experiment with Postgres export.
How to Import Data to PostgreSQL
We’re going to use COPY, pg_restore, and dbForge Studio for PostgreSQL to make a Postgres import.
Let’s start with COPY.
Using COPY for Postgres Import
The syntax to import data using copy is also straightforward:
COPY table_name [ ( column_name [, ...] ) ]
FROM { 'filename' | PROGRAM 'command' }
[ [ WITH ] ( option [, ...] ) ]
[ WHERE condition ]

where option can be one of:
    FORMAT format_name
    DELIMITER 'delimiter_character'
    NULL 'null_string'
    DEFAULT 'default_string'
    HEADER [ boolean | MATCH ]
    QUOTE 'quote_character'
    ESCAPE 'escape_character'
    FORCE_QUOTE { ( column_name [, ...] ) | * }
    FORCE_NOT_NULL ( column_name [, ...] )
    FORCE_NULL ( column_name [, ...] )
    ENCODING 'encoding_name'
The most important in this basic syntax is again, the COPY keyword, table_name, the keyword FROM, and the filename, where the data will come from. The FROM keyword gives us a hint that it’s for Postgres import.
Let’s have some examples.
Practical Examples of Using COPY for Postgres Import
The key to a successful import using COPY is to use the same options during the export. The following examples will use the export files created earlier.
Example 1: Basic Postgres Import
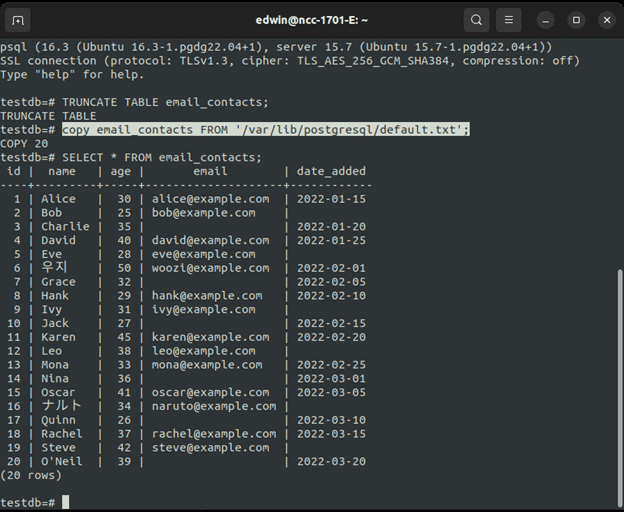
Let’s use the same table and export files we did earlier. So, before we import, let’s empty the table first using TRUNCATE in psql:
$ psql -h localhost -U postgres -W -d testdb
Password:
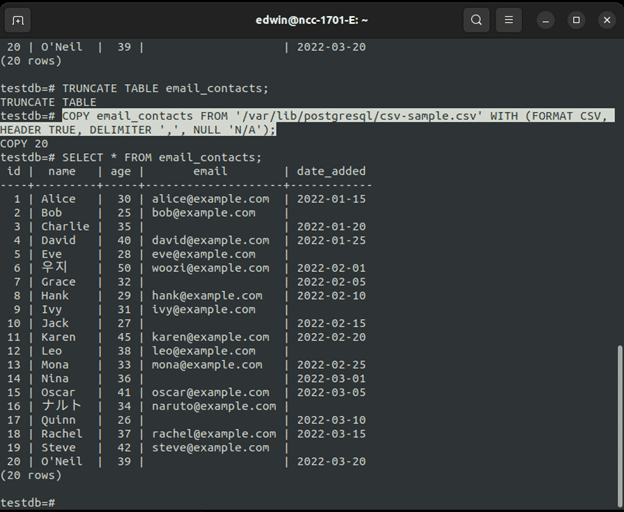
testdb=# TRUNCATE TABLE email_contacts;Then, we COPY:
COPY email_contacts FROM 'https://cdn.blackdown.org/var/lib/postgresql/default.txt';We used the first file we exported which is a tab-delimited text file. It imported the data just fine. A SELECT statement on the table can confirm it. Check it out below:
Example 2: Import a CSV File with Headers and Null Handling
Now, we will import from a CSV file using the same options during the export. See Example 2 of the COPY for Postgres Export for reference. Here’s the import equivalent:
COPY email_contacts FROM 'https://cdn.blackdown.org/var/lib/postgresql/csv-sample.csv' WITH (FORMAT CSV, HEADER TRUE, DELIMITER ',', NULL 'N/A');The source file is a comma-delimited CSV file with N/A when NULL. The following is a confirmation of the successful import:
Example 3: Wrong Delimiters Cause Errors
Changing the COPY TO to COPY FROM is getting boring really fast. So, let’s see what happens if you use the wrong delimiters. In Example 3, we export to CSV using COPY, using a pipe delimiter with forced quotes.
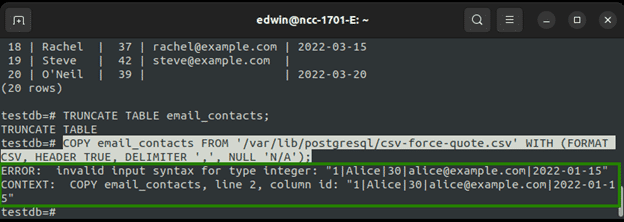
Let’s see what happens when we change the delimiter and remove the FORCE_QUOTE:
COPY email_contacts FROM 'https://cdn.blackdown.org/var/lib/postgresql/csv-force-quote.csv' WITH (FORMAT CSV, HEADER TRUE, DELIMITER ',', NULL 'N/A');Check out the result below:
See?
It’s a problematic import because of the wrong delimiter.
Example 4: Using FORCE_NOT_NULL in Postgres Import
Earlier, we handled nulls by replacing them with N/A in the CSV file. If we import it back, those values become NULLs in the table.
What if we use FORCE_NOT_NULL?
With this option, the null values before will no longer be NULL but N/A in the table. Here’s an example:
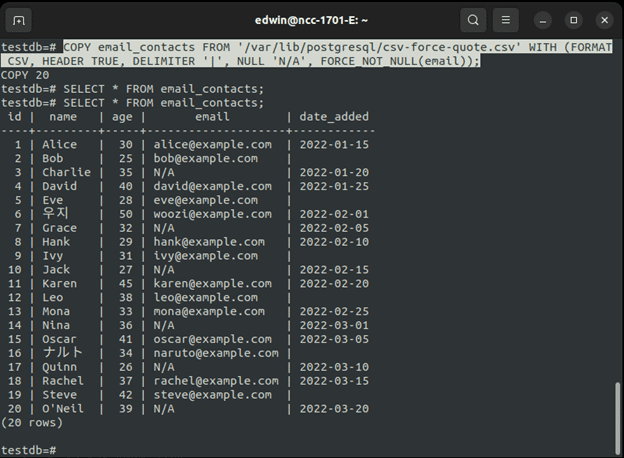
COPY email_contacts FROM 'https://cdn.blackdown.org/var/lib/postgresql/csv-force-quote.csv' WITH (FORMAT CSV, HEADER TRUE, DELIMITER '|', NULL 'N/A', FORCE_NOT_NULL(email));The email column is nullable, and we already saw from the previous screenshots that there are null values. The FORCE_NOT_NULL will remove all those null values and replace them with the null string value.
Confused? The null string value is one of the COPY options to handle nulls: NULL ‘null_string’ (See COPY syntax). In this example, it’s N/A.
Look at the result of the import below:
The null values were replaced by N/A.
Note: FORCE_NULL does the opposite.
Using PG_RESTORE for Postgres Import
The opposite of pg_dump is pg_restore. As the name implies, it will restore to the target whatever is dumped or exported using pg_dump.
The basic syntax for pg_restore is below:
pg_restore -h hostname -U username -W -F format -f filename_directory -d dbname [-t table_name] [-a] [-s] [-C] [-c] [-v]Some of the options are the same with pg_dump except for the following:
-d dbname: connect and restore to the database specified indbname.-C: Creates the database or drops it if it exists before restoring or importing. The database name used will come from the-d dbname.-c: Drops the object before restoring for a clean restore or import.-F format:pg_restoreonly accepts the formats d (directory), c (custom), or t (Tar). For the plain SQL text file, use psql.-v: Optional. Makespg_restoremore verbose with its messages during import or restore.
Practical Examples of Using PG_RESTORE for Postgres Import
Example 1: Restoring a Table from a Custom Format Dump
The following code restores or imports the rows from a custom format dump.
pg_restore -h localhost -U postgres -W -d testdb -c -t email_contacts -v ~/Source/sql/testdb.customExample 2: Restoring a Table from a Directory Format
The sample below will restore the email_contacts records using the directory format (-F d). The dump is located in the ~/Source/sql/testdb folder. Output is verbose with -v.
pg_restore -h localhost -U postgres -W -d testdb -F d -c -t email_contacts -v ~/Source/sql/testdb/Using dbForge Studio for PostgreSQL to Import Data
The following shows how to start the Import wizard in dbForge Studio for PostgreSQL:
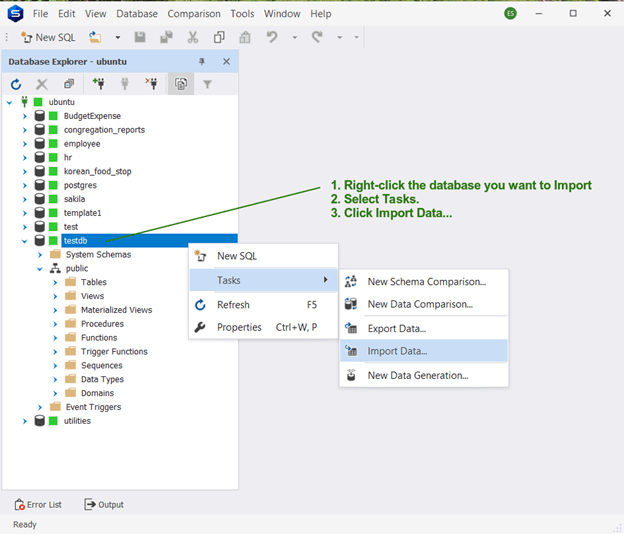
From the Database Explorer, right-click the database you want to import some data. Then, from the context menu, select Tasks. Then, click Import Data. The Import wizard window will appear.
Postgres Import Data Using dbForge Studio for PostgreSQL
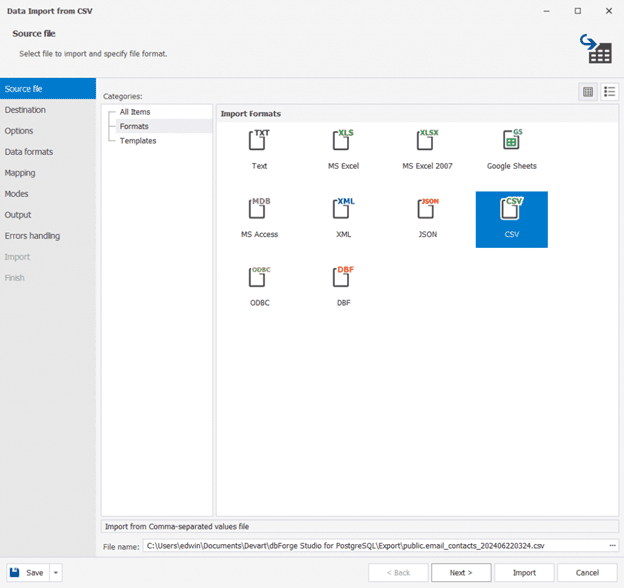
Step 1: Select the File Format and the File to Import
We will use the CSV format and the CSV file we used to export earlier. Check out the sample below on how to select a format and a file:
Select a format. In this case, CSV. Then, choose a CSV file.
Click Next to proceed to the next step.
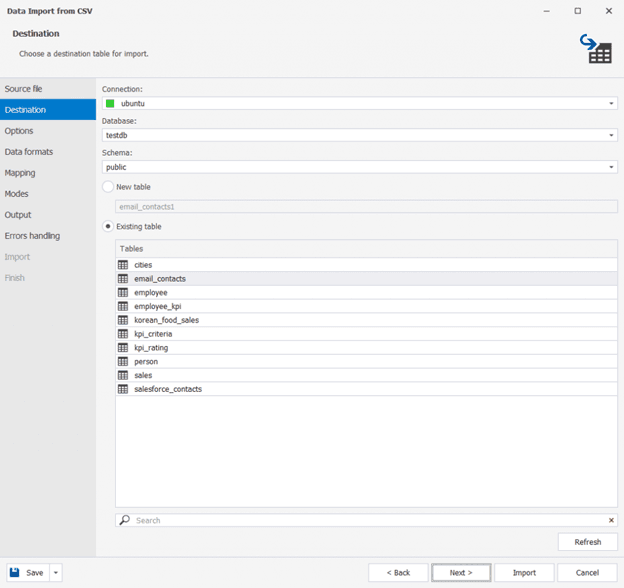
Step 2: Choose the Destination
Then, choose the connection, database, schema, and target table.
Then, click Next to proceed.
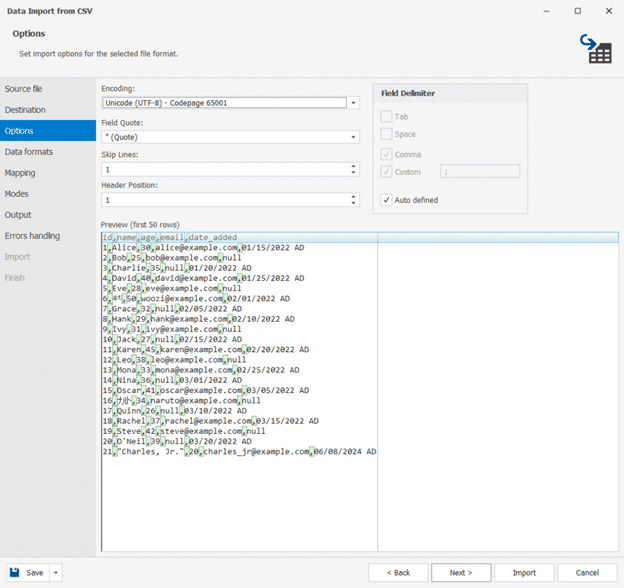
Step 3: Indicate Options for the Postgres Import
In this step, you can specify the encoding, the headers, the delimiter, and more. See the example below with sample data.
Click Next to proceed.
Step 4: Choose Data Type Formats and Column Settings
This step will let you choose the Null string to use to handle nulls. Also, the thousand separator and decimal separator. See below:
At this point, you can click Import or click Next for the column mapping.
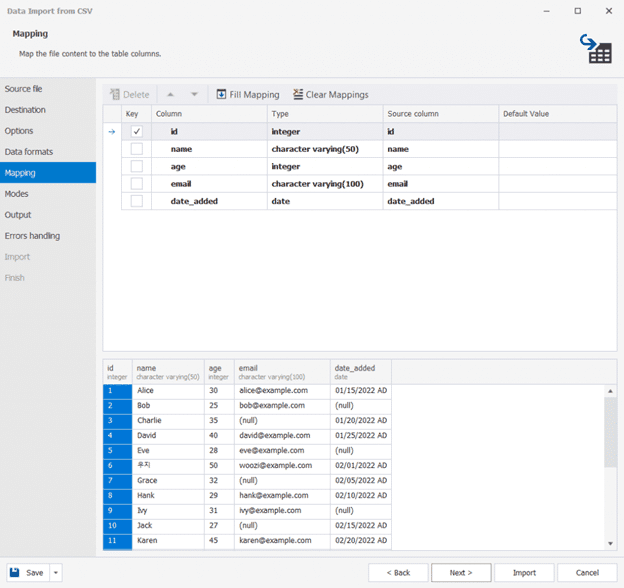
Step 5: Do the Data Mapping
Data mapping is when you specify the columns from the source and align them with the target columns. In this step, you will do just that.
Check out the sample screen below:

Notice we mark the id column as the key. This is important because you can’t define primary keys in CSV data. If you have existing data in the target, you need this as the basis for updating them.
By default, dbForge Studio can map the columns for you based on names. In our example, the names of the source and target columns are the same. So, you just need to click Next.
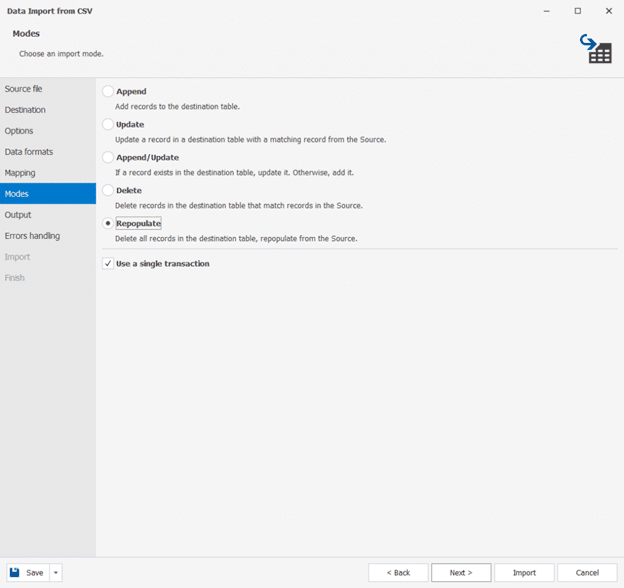
Step 6. Choosing the Mode to Write
This step will let you choose if you want to delete the rows first or not or simply Append the new rows. Other options when data exist in the target are Update, Append/Update, and Delete. They are self-explanatory, but there are descriptions in the window if you don’t get it the first time. If you didn’t define a key in Step 5 earlier, these other options are disabled.
In the sample below, we chose Repopulate.
You can proceed by clicking Next or Import.
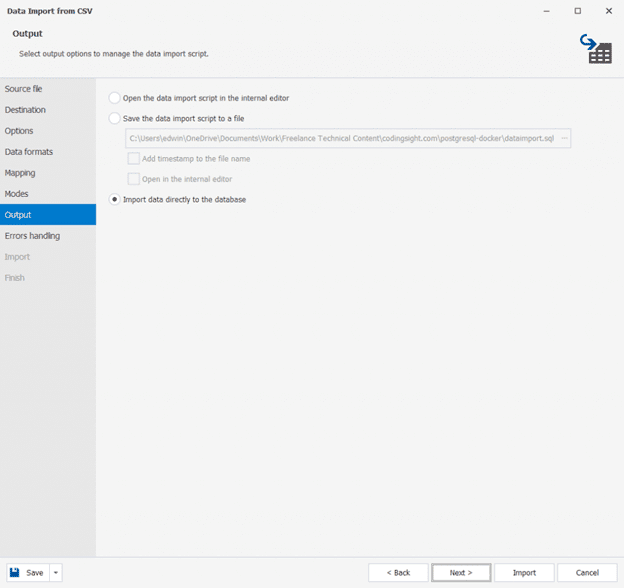
Step 7: Choose from Output Options
There are three possibilities in this step. You can choose between going directly to the database, opening the data import script, or saving it to file.
I chose to import it directly into the database.
Then, click Next to proceed.
Step 8: Error Handling and Log Setting
This is the same as the Export error handling and logging. Choose between Prompting a user for action, ignoring, or aborting the first error. Then, mark checked if you want to use a log file.
See a sample below:
Click Import to proceed.
Once successful, you will see a similar window below:
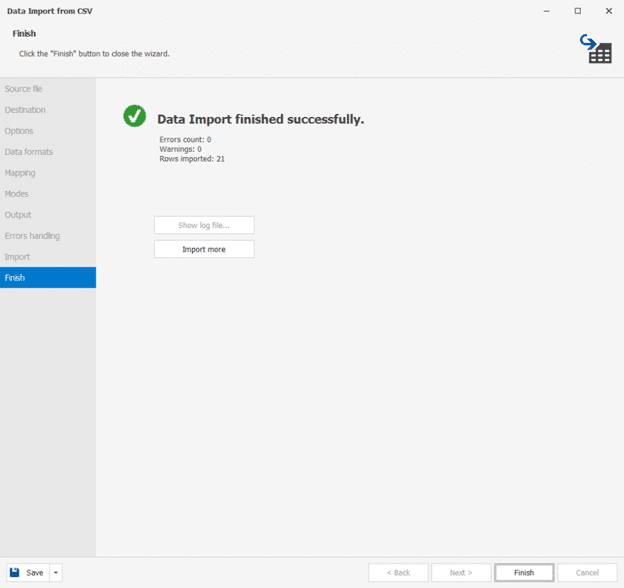
That’s it for the manual Postgres import. You can also automate the process by saving a template and saving the Command Line. And the same with the Export process, you can automate the Import process for repetitive Postgres imports.
8 Common Mistakes Newbies Make in Postgres Import and Export
The following are some of the mistakes newbies make in Postgres import and export.
1. File Permissions
All the tools we used will write to something whether file or table. You need appropriate permissions for that. Make sure you have read/write permissions or the Postgres import and export will fail.
2. File Path Issues
Another problem is specifying the wrong path for the Postgres import and export files. As much as possible, use an absolute path. If the target folder does not exist, an error will occur.
3. Delimiter Issues
Whatever delimiter you use for the Postgres export, it should be the same for the Postgres import. Having different delimiters will cause an error.
4. CSV Headers
You can either choose to have CSV headers or not. But your choice should be the same between Postgres export and import.
5. Data Type Mismatch
This one applies to Postgres import. The data type mismatch happens when the data type of a value from the export file is not the same or compatible with the table column. For example, the value 100000 is not the same as ‘$100,000’. The first is a number and the other is a string.
6. NULL Values
Handling nulls can be tricky. Use the same null string in the NULL option of the COPY command as well as in dbForge Studio for PostgreSQL. If it is N/A in the export, it should be the same with the import.
7. Encoding Issues
We had a sample earlier with an incompatible encoding. Use UTF8 as it is the most flexible. It can handle Asian, European, and other characters.
8. Special Character Issues
Using a comma as a delimiter and having a comma in the data may cause problems during Postgres import. Another caveat is the single quote. Handle this by enclosing them with a different quote character. For example, use a backtick to enclose column values with single and double quotes.
Takeaways in Postgres Import and Export
Postgres import and export requires tools and some nifty tricks to make it successful. Depending on the requirements, you can use COPY, pg_dump/pg_restore, or dbForge Studio for PostgreSQL.
dbForge Studio for PostgreSQL can handle various formats. It also has many options to handle quotes, nulls, and many more. It also has other features that are useful for database developers, analysts, and alike.